Showing posts with label recipe. Show all posts

Saturday, November 4, 2017

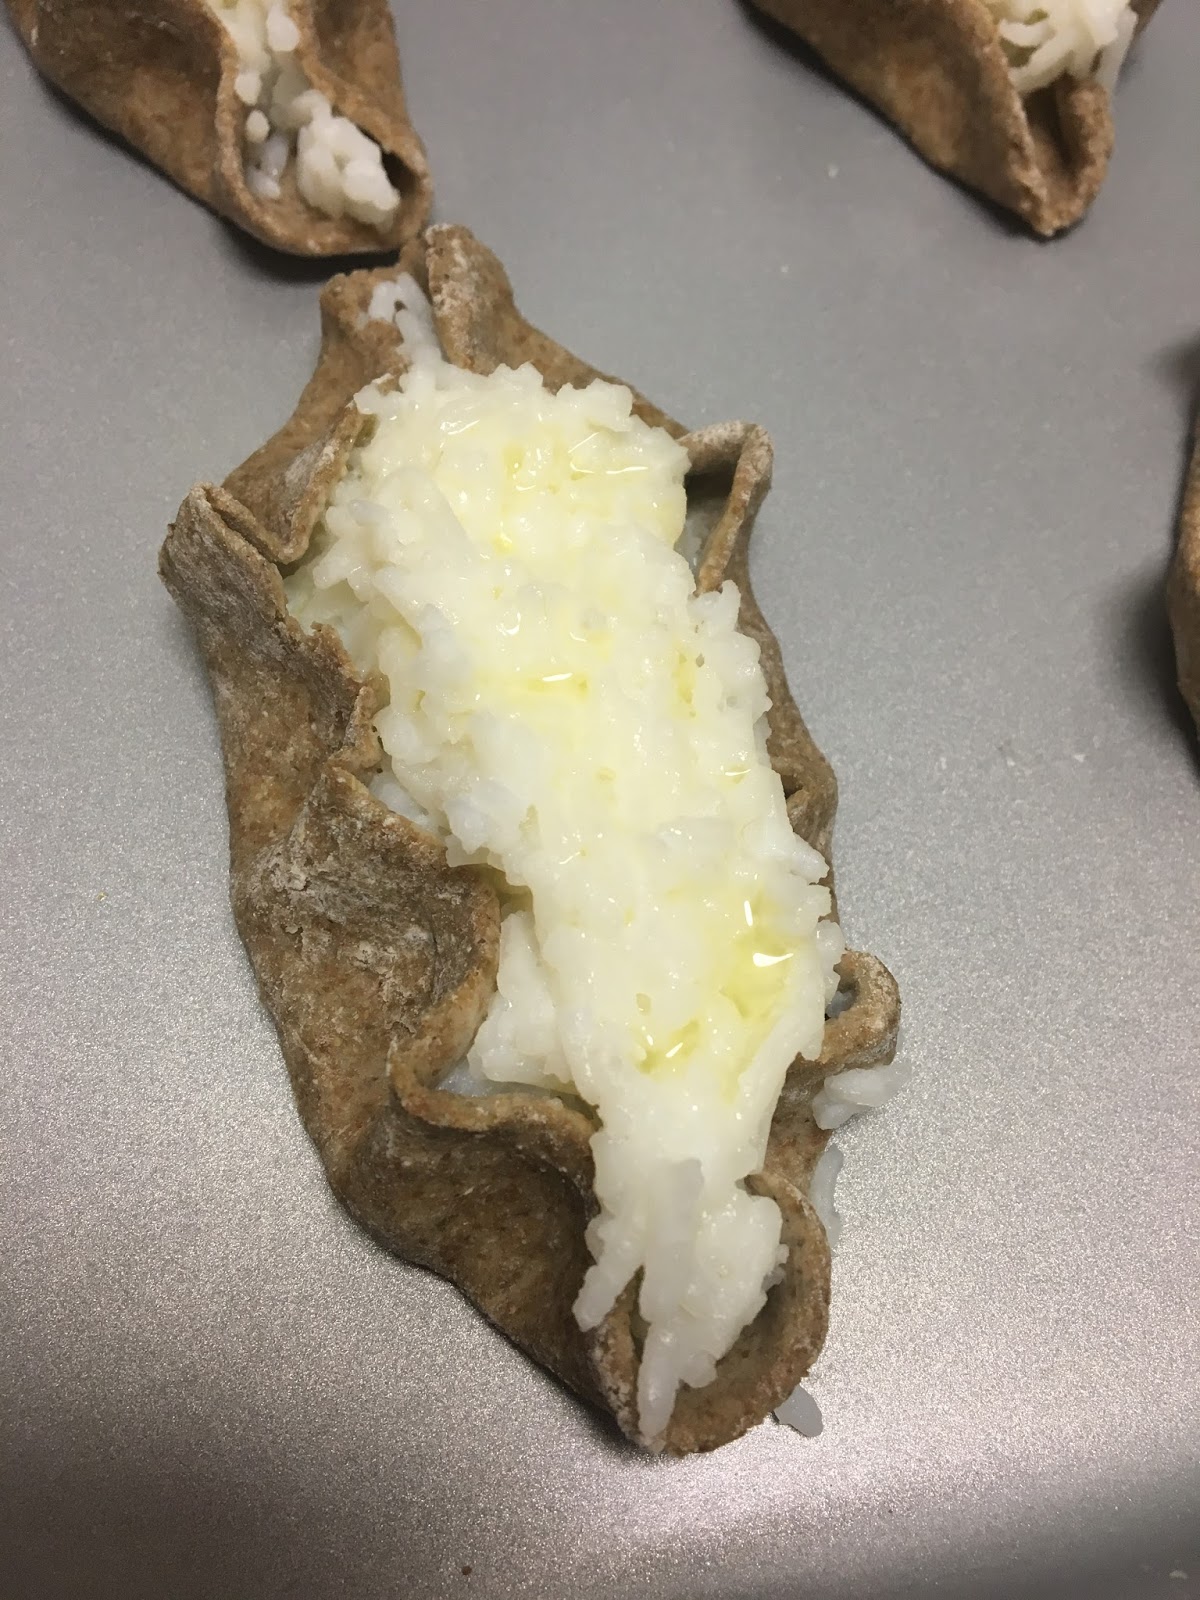
Karelian Pasties with Egg Butter

With Aiti
My grandmother (step-grandmother, technically) is from Finland. She is that quintessential grandma who bakes and sings you lullabies, while also being an Olympic-level cross-country skier. I grew up eating pulla every Easter and piirakkas (karelian pasties) when we went to visit. When the two of us took a trip to Finland in 2006, we ate piirakkas every morning for breakfast. This is the first time I have made them myself, and I have no idea why. They are delicious. Aiti, this one is for you.
Aiti in Helsinki, Finland
Rice Pudding
2 C water
1 C uncooked white rice
2 C milk
salt to taste


Combine rice and water in a saucepan over medium heat. Bring to a boil, then reduce heat, cover, and simmer for 20 minutes, or until water is absorbed. Stir in milk, cover, and cook until milk is absorbed by the rice, about 20 minutes. Season with salt to taste.


Rye Crust
1 C water
2 C rye flour
2 t salt
1 C all-purpose flour (as needed)
3 T butter, melted

Preheat the oven to 450 degrees F (220 degrees C). In a medium bowl, stir together the salt and rye flour. Stir in water. Mix in all-purpose flour 1/4 cup at a time until dough is just past the sticky stage. Divide the dough into 16 equal portions.


On a lightly floured surface, roll each piece of dough out into a thin circle 6 inches in diameter. The dough should be as thin as possible (seriously, you'll think it's too thin, but you'll be wrong). Place about 3 tablespoons of the rice mixture in the center of each circle. Spread the mixture out to within 1 inch of the edges. Fold the edges of the dough upward, and crimp the edges so as to allow the pastries to hold their shape. Pinch the sides at each end to form a little boat. Place pastries about 3 inches apart on an ungreased baking sheet, and brush the tops with butter.


Bake for 10 to 15 minutes in the preheated oven, until the dough is firm, and the rice porridge is slightly browned on the top. Serve warm, topped with egg butter.


Egg Butter
6 hardboiled eggs
4 T butter
salt to taste


Chop eggs and mix with melted butter. Essentially just buttery egg salad.

Wednesday, March 15, 2017

For Saint Patrick's Day - Irish Soda Bread!

3 C flour
3 Tbsp sugar
1 tsp salt
1 Tbsp baking powder
1/2 tsp baking soda
1 Tbsp butter, softened
1 C raisins (optional)
1 Egg
2 C buttermilk

Preheat oven to 325°F, grease bread pan.

Combine flour, sugar, salt, baking powder and soda in a bowl, mix well. Work in butter. Add raisins if desired.

In measuring cup, beat egg. Add enough buttermilk to equal 2 C (this will be about 1 3/4 C buttermilk, depending on the size of the egg), mix well.

Add milk mixture to dry ingredients, mix well. Kneading the dough is not necessary.

Bake in greased bread pan for 1 hour. Let stand for 5 minutes, then remove from pan and cool on wire rack.

Best served warm with LOTS of butter :)

Saturday, October 25, 2014

Mac and Cheese

It's been way too long since I posted a recipe to this blog, so here is a favorite of ours. I make it way too often to be healthy, but it's just so yummy, I can't help it.
With fake crab meat

4 C whole milk
1 stick butter
1/2 C flour
Salt, pepper, mustard to taste (optional)
1 lb macaroni (or whatever pasta is in your
     cupboard)
4 C shredded cheese (I like a mixture of
     cheddar and whatever else is on hand)
Breadcrumbs (optional)
Crabmeat (fake or not, or bacon, chicken,
     green onions, or anything else you want to 
     add)

The great thing about this recipe is that, difficult as the roux is to make, once that is done and you have the cheese sauce made, you can add pretty much anything and have it be crazy delicious.

Bring a large saucepan of water to a boil over high heat, add salt if you want (I never do and it turns out fine). Add the pasta and cook until it’s almost al dente, then drain and rinse with cold water; set aside.

If you plan to top with breadcrumbs and bake it (optional but highly recommended), heat the oven to 400°F.

Heat the milk in a medium saucepan over medium-high heat until it just comes to a simmer, then turn off the heat and set aside.

Here is the hard part. In the large saucepan, melt the butter over medium heat. Add the flour and whisk constantly until the mixture turns light brown in color, about 3 minutes. Remove from the heat.

While whisking constantly, slowly add the hot milk to the flour mixture until evenly combined and smooth. It will get very thick when you first add the milk, then thin out. Don't be like me and get upset if it turns out a little lumpy the first time - it takes practice and it will still taste good.

Return the saucepan to medium-high heat and while whisking constantly, cook until the sauce thickens and coats the back of a spoon, about 2 to 3 minutes. Stir in salt, pepper, mustard or any other spices to taste.

With green onions and topped with more cheese
Stir in cheese just until melted and smooth (you can reserve some of the cheese to top the pasta if you plan on baking it). Add the pasta, any meat or vegetables you want and continue cooking, stirring occasionally, until the pasta is heated through and steaming, about 2 to 4 minutes. Serve immediately or, if baking, transfer to a 5-quart baking dish, sprinkle with the breadcrumbs, and bake until bubbling and brown on top, about 25 to 30 minutes.

Wednesday, December 25, 2013

Perfect Banana Bread

I've used this recipe at least 5 times already this semester and it's fantastic. 


4 ripe bananas, smashed
1/3 C melted butter 
     (vegetable oil)
3/4 C granulated sugar
1 egg, beaten 
     (1/4 C Egg beaters)
1 tsp vanilla extract
1 tsp baking soda
Pinch of salt
1 1/2 C all purpose flour
1/2 C chocolate chips 
      (highly recommended but          optional)


Preheat oven to 350 F (175 C).

Mix butter in with bananas. Add sugar, egg and vanilla - mix.

Sprinkle baking soda and salt over mixture, mix thoroughly. 

Add flour, mix. Add chocolate chips last, if desired.

Pour batter into greased 4x8 inch loaf pan. 

Bake 1 hour. Cool on rack.


Due to the unusually high number of bananas in this recipe, the center of the loaf may remain a little gooey. It is advised to not cook the bread longer, as this may cause it to burn. Instead, enjoy the gooeyness. 


Merry Christmas, one and all!


Tuesday, December 24, 2013

Christmas Cookies

  • This recipe is modified from one available on the Hersey Kiss website, their Triple Chocolate Cookies - I didn't feel like going into a chocolate coma, so I changed it to a sugar cookie recipe. I also really hate cleaning up after cooking/baking, so I like to use as few dishes as possible. That's why I use oil instead of butter (easier to mix) and don't bother sifting dry ingredients together in a separate bowl. These turned out just fine.

  • 1/2 C vegetable oil
    3/4 C granulated sugar
    3/4 C packed light brown sugar
    2 tsp vanilla extract
    2 eggs (1/2 C Eggbeaters)
    1 Tbsp milk
    2 1/2 C all-purpose flour
    1 tsp baking soda
    1/2 tsp salt
    Around 45 Hersey Kisses

    Remove wrappers from chocolate pieces. Preheat oven to 350°F.

    Mix oil, granulated sugar, brown sugar and vanilla in large bowl until well blended. Add eggs and milk; mix well.

    Stir together flour, baking soda and salt; gradually add to sugar mixture, mix until well blended.

    Shape dough into 1-inch balls. Place on ungreased cookie sheet.

    Bake 10 to 11 minutes or until set. Gently press Kiss (no, not with your face, that would hurt) in center of each cookie; remove from cookie sheet to wire rack. Cool completely. 

  • Makes about 45 cookies.


Wednesday, May 18, 2011

Birthday feast!

Tuesday was my 24th birthday, and rather than getting food from Dinosaur BBQ like my mother suggested (which I did for my graduation party last year, I am by no means knocking the deliciousness that is Dinosaur), I wanted to do a more personal dinner.

I asked a few friends over and together we made and ate dinner. My mom, ever the helpful one, lent her kitchen and her cooking skills. She made (above) shrimp sauteed in olive oil with loads of garlic.

I had the master of Syracuse alcohol, Fernando, take care of the drinks.


Sangira a la Fernando

One bottle white wine
1/2 C raspberry rum
1 C orange juice
2/3 C sugar
1/2 C raspberries, smashed
1 mango, diced
1 lime, sliced
1 lemon, sliced
1 orange, sliced
peach, diced

Put sugar, rum and orange juice into pitcher, stir until sugar is dissolved. Add all of the fruit, let sit until you are ready to serve. The sugar allows the fruit to soak in a lot of the alcohol, so the longer it sits, the more potent the fruit will be.

Add wine immediately before serving.

Fernando made a red wine sangria for last Christmas dinner, and it was amazing. I like white wine better, so I asked him to try one for my birthday, and it turned out even better than the last. Very fruity, very sweet and very strong. Fantastic.

My mom also made an amazing salad/appetizer from her favorite Tapas restaurant in DC, Jaleo.

Apple and Manchego Salad

1 Granny Smith apple
Manchego cheese
Vinegar or Lemon juice

Slice the apple into long, thin spears. Slice about as much of the cheese into similar pieces. Toss together in a bowl, sprinkle with vinegar or lemon juice to give it a kick and so the apple doesn't brown.

I made the crepes, the recipe for which can be found elsewhere.

Also on the table are bowls of Spanish olives, baked brie, roasted peppers, cantaloupe wrapped in prosciutto, a salad that no one touched, and a Spanish dessert bread.

For dessert we had a vegan chocolate cake that Sally won at a silent auction
and the traditional lemon cake, my favorite. We also had a second pitcher of sangria that Fernando was good enough to make - this is a family of wine drinkers, in case you hadn't guessed that already. We were all quite full and tipsy by the end of the evening, and ended the affair with a story from one of the guests, a former children's librarian.

All in all, a pretty good birthday.

Final photo credit: Hannah Nast

Tuesday, May 3, 2011

Snickerdoodles!

Snickerdoodles used to be my favorite cookies in the world, and I haven't made any for a long time. I lost an old recipe I had, which I remember being phenomenal, but this one is pretty good too. Good enough that Dave consumed half a tray in about two minutes, then made a new house rule: I am only allowed to bake once a month, lest he get fat. I guess moderation is a concept beyond him.

Snickerdoodles

1/2 C butter, softened
1/2 C shortening
1 1/2 C white sugar
2 eggs (1/2 C eggbeaters)
2 t vanilla extract
2 3/4 C all-purpose flour
2 t baking powder
1 t baking soda
1/4 t salt
3 T white sugar
3 t ground cinnamon

Preheat oven to 375.

Cream together the butter, shortening, 1 1/2 C sugar, the eggs and vanilla. Mix in the flour, baking powder, baking soda and salt. You may find it easiest to mix in the last three first, then the flour one cup at a time. This mixing should be done by hand; the consistency of the cookies is drastically different otherwise.

Mix the remaining sugar and cinnamon for the topping. You will have to coat each cookie in this, so you will find in much easier to put the cinnamon sugar in a sandwich bag.

You will probably need two cookie sheets going at once, because this makes about 48 cookies. Cover each sheet in parchment paper, it will make you life considerably easier.

Shape the dough by rounded teaspoonfuls into balls. Roll them lightly between your palms for a few seconds to form them. The dough is very sticky, so make sure to wet your hands with cold water first, and do not roll for too hard or too long, or you will just make a mess. x_x

Drop the dough balls one by one in the sandwich bag, shake it a little to coat in the topping, then place on a cookie sheet. Wasn't that easier than rolling each one?

Bake sheets one at a time for 8 minutes. Only 8. When you take them out the tops of the cookies will have cracked, and in the cracks you may see wet dough. DO NOT cook them longer. They will just harden. You want these to be chewy cookies.

If you are able to put one tray of 12 cookies in every 8 minutes, this shouldn't take you much longer than an hour to do.

Tuesday, April 19, 2011

Passover - Day 2

Today I am making the noodle kugel I made for Thanksgiving - it is mostly kosher, and I have lots of leftovers that need using, so there we are. Since I promised new recipes this week, and that isn't, here are my instructions for Fried Matzo. This is another recipe Dave and I use a lot to make the massive stores of matzo we have palatable, and I must say, it is quite fantastic.

Fried Matzo

4 matzo, broken into 3rds
boiling water
2 eggs
2 T milk
1 t vanilla
2 T sugar
1/2 t cinnamon

Put the matzo in a dish and pour the boiling water over it. Allow to sit for 30 seconds, then drain the water. This is to allow the matzo to become soft enough to soak up the egg. You don't want it to fall apart, just to be flexible.

Heat a frying pan on high. Mix the eggs, milk, vanilla, sugar and cinnamon together in a bowl. Dip the matzo pieces in the batter until they are coated, then lay them in the frying pan. Allow to cook until brown, then flip. This should not take more than a minute per side.

Serve with more sugar sprinkled on top, or with maple syrup.

This is basically French toast, but with matzo instead of bread. If you have a particular way of making French toast, by all means use it, and just follow my instructions on preparing the matzo.

Monday, April 18, 2011

Passover begins... now.

So, being a Jew, even a fake Jew*, is really difficult in Maine. There are about 7 here, including us, so when I go to a grocery store and ask for Kosher food, I get a blank look. When I clarify that as "Jewish food", I get asked "Jews don't eat normal food?" I give up then.

I will try to have the week of Passover set up like Thanksgiving and post one recipe per day. Today is the easiest and the one Dave and I use most often. It has become such a favorite that we even eat it NOT during Passover. Yes, we have matzo throughout the year. We are still working on the case we bought two years ago.

Matzo Pizza

1 matzo
pasta sauce
shredded cheese

The hardest thing about this recipe is finding kosher sauce. Dairy is still in for Passover, so that isn't a problem.

Put one matzo on a plate. Cover with pasta sauce, sprinkle with cheese. Microwave. That's it. I'm sure you could make this fancier and bake it in an oven and shit, but why bother? This is the easy recipe. There will be more complicated ones to come, never fear.

*Dave is Jewish on his father's side, so it doesn't really count for either of us. However, it makes his grandmother happy, so we try.

Monday, January 24, 2011

Granola Cookies = Amazing

As it has been hovering around 0 for the past few days, and is currently -6 degrees, I wanted to bake. I also want to comply with the diet, so I found the healthiest-looking cookie recipe I could and added even more stuff to it. The result is pretty amazing.

Granola Cookies

1/2 C of butter, melted (1 stick)
3/4 C white sugar
2 eggs (1/2 C eggbeaters)
1 C all-purpose flour
1 t baking powder
2 t cinnamon
1 t nutmeg
1 t vanilla
1/2 t salt
1/2 C chopped walnuts
1/2 C dried cranberries
1 apple, peeled and chopped (a crisp, flavorful apple - one you would use in a pie)
1 1/2 cup rolled or old fashioned oats

Preheat oven to 350 degrees.

In a large bowl, cream together the butter and sugar. Beat in eggs until well blended.

Combine the flour, baking powder, cinnamon, nutmeg, vanilla and salt; stir into sugar mixture until well blended.

Fold in the walnuts, dried cranberries, apple and oats. Drop dough by spoonfuls about 2 inches apart onto an un-greased baking sheet.

Bake for 12-15 minutes. Remove from baking sheet while still warm and cool on wire rack.

I was looking for a cookie recipe that kind of tasted good, and that I also felt good about eating. These are unbelievably delicious, and I feel good about eating them. Possibly all of them. Tonight.

Wednesday, January 12, 2011

Aunt Lydia's Sugar Cookies!

Technically, Lydia was my great, great aunt. She was the second of eight children born to Allison Henry Porter (whom I am named after) and his wife Joanna. Lydia's younger sister, Mary, was my great grandmother. As far as I am aware, this is Lydia's original recipe. They have always been hugely popular in my family, and are always referred to as "Aunt Lyda's sugah cookies" (with a Texan accent).
Making these cookies is my oldest cooking memory, and this is the first time I have made them on my own. I recently became the owner of a copy of The Porter Family Cookbook, put together in the late 80s by my grandmother. Not only does it have hundreds of beloved family recipes, it has a family tree dating back 150 years. One of my goals in life is to update this book and add some historical chapters to it, and have it actually published.

Old Fashioned Sugar Cookies

2 1/4 C flour
1/4 t salt
2 t baking powder
1/2 C Crisco
1 C sugar
2 eggs, beaten (1/2 C eggbeaters)
1/2 t vanilla
1 T milk

Cream the Crisco and sugar together in a bowl. In a separate bowl, sift the flour, salt and baking powder together.

To the sugar mixture, add the eggs, vanilla, milk.

Then add the dry ingredients. Mix thoroughly and chill. The dough must be cold enough that the cookies can keep their shape, so a few hours in the refrigerator is best.

Roll the dough thin on a floured board - I use a large plastic place mat, as this makes clean up easier. Cut into shapes or rounds. Bake at 375 degrees for 12-15 minutes.

I decided to make these cookies today because it was snowing. All. Day. Below is a photo of the result of one day of snow.

Also, making cookies gave me an excuse to use the awesome cookie cutters I got for Christmas.
Who wouldn't want cookies in the shape of a beehive or a pirate ship?

Yum.

Friday, December 17, 2010

Chocolate Covered Orange Peel

This has been a favorite of my dad's for as long as I can remember, and as I have gotten older, my tastes have changed enough that now I love it too. This is the third time I have attempted this treat (only the second successful one), and this is definitely the best recipe I have found for it. Enjoy.

Chocolate Covered Orange Peel

Makes about 2 1/2 cups

3 large navel oranges, scrubbed

3 tablespoons light corn syrup

1 cup sugar

1 cup water

12 ounces bittersweet chocolate (The best you can find)

For the Peel

Using a sharp knife, cut a thin slice off the top and bottom of each orange to expose the flesh. Score the peel of each orange into quarters, cutting through the white pith, and carefully pull the quarters of peel off the orange. Using a sharp spoon, scrape off any stringy membranes from the inside of the peel (do not scrape off the white pith). Cut each quarter crosswise into 1/4-inch-wide strips.

*A few other recipes I have tried in the past instructed the removal of the pith. Don't do it. The pith is what soaks in the sugar, and prevents the peel from becoming incredibly sticky. It also leaves more peel, which means more flavor.*

Put the orange peel in a large heavy saucepan, add cold water to cover and bring to a boil. Drain. Repeat two more times (blanching the peel removes the bitterness).

Return the orange peel to the saucepan, add cold water to cover by about 1 inch and bring to a boil. Reduce the heat and simmer gently, stirring occasionally, until the peel is tender when pierced with a knife, about 15 minutes. Drain and set aside.

Combine the corn syrup, sugar and water in the same saucepan in which you blanched the peel and bring to a boil, stirring to dissolve the sugar. Add the orange peel.

Bring to a simmer, reduce the heat and simmer gently, stirring once or twice, until the peel is translucent and very tender, and the syrup has reduced to about half a cup, 45 minutes to an hour.

*Do not allow the syrup to reduce to less than this, or the bottom of the pan will become too hot and will crystallize the sugar. Seriously. I tried doing this last year, and melted the pan because I fell asleep.*

Using a slotted spoon or a fork, transfer the peel to a wire rack to drain, separating all the strips of peel. (I use a cookie sheet covered in wax paper. Less clean up afterward.) Let cool and let stand until dry, at least 4 hours - overnight is best.

Once the orange peel is thoroughly dry, it can be stored in an airtight tin at room temperature for up to 1 week.

For the Chocolate

Melt the chocolate in a double boiler. This involves filling the bottom pot about half full with water, putting the chocolate in the top pot, and heating uncovered at a low temperature. If you do not have a double boiler, you can improvise one with a pot and a glass bowl.

Melt the chocolate, and stir to make sure it is smooth.

Turn off the heat. Dip each piece of peel in the chocolate and cover as much as desired. Lay on a piece of wax or parchment paper to dry. You may have chocolate left over, so have some other dried fruit or nuts on hand to dip. I used dried cranberries and pieces of candied ginger.

This is a time consuming recipe, so make sure you are into it before attempting. It is delicious though, and not terribly difficult, so it is good for someone just starting out in the chocolate making field. I find it helps to listen to the soundtrack for Chocolat to put you in the mood. :)

Tuesday, November 30, 2010

Post-Thanksgiving Recipe - Thanksgiving Leftover Casserole

If you're like me, you probably have a Tupperware container full of chicken/turkey/grouse/ostrich/Big Bird in your fridge right now. If you're also like me, the idea of pulling out a piece of meat - touching it in any way - and eating it repulses you. So, what are you to do with all of that food, which, given a few weeks, may resolve itself into some mutant, eyeless freak of nature and peck you to death in your sleep?

You do this.

Thanksgiving Leftover Casserole

1 can of cream of celery soup
1/2 bag frozen peas (about 8 oz)
1/3 C milk
2 C chicken
3 C stuffing

Add soup, peas and milk to a microwave safe bowl, cover. Microwave 3 minutes, stir and re-cover, then microwave 4 minutes more.

Add chicken and two cups of stuffing, stir, top with remaining stuffing. Microwave uncovered for 7-9 minutes.

Thursday, November 25, 2010

Thanksgiving recipe #7 - Harvest Chicken

The chicken was probably the easiest thing we made today - using a crock pot to cook it not only made it self sufficient, but it kept the oven free for the hundred and one other dishes we were making. For this we added to a recipe my mom had used recently, to much success.

Harvest Chicken

1 whole chicken, and additional parts depending on how many people you are feeding
Apple cider (I used cinnamon apple cider for added flavor)
4 apples, sliced
dried cranberries
mulling spices (cinnamon, cloves, nutmeg, orange peel, etc)

Set the crock pot to cook for 6 hours - this will allow the chicken to cook for a while, and keep it out of your hair all day, but it wont get too dry.

Make sure the chicken is cleaned out, remove all wayward feathers.


Put the chicken in the crock pot.

Cover the chicken with apple cider - use enough to fill the crock pot halfway. Drop in dried cranberries and mulling spices, cover the top with apple slices.


Cook for the full six hours.

Make sure to remove all bones and cloves - cloves are edible, but kinda nasty, so try to avoid them.

The chicken was delicious, and we even used the serving plate my grandmother sent us :)

Wednesday, November 24, 2010

Thanksgiving recipe #5 -Blackberry Pie

Yet another dessert - only one more after this, I promise :)

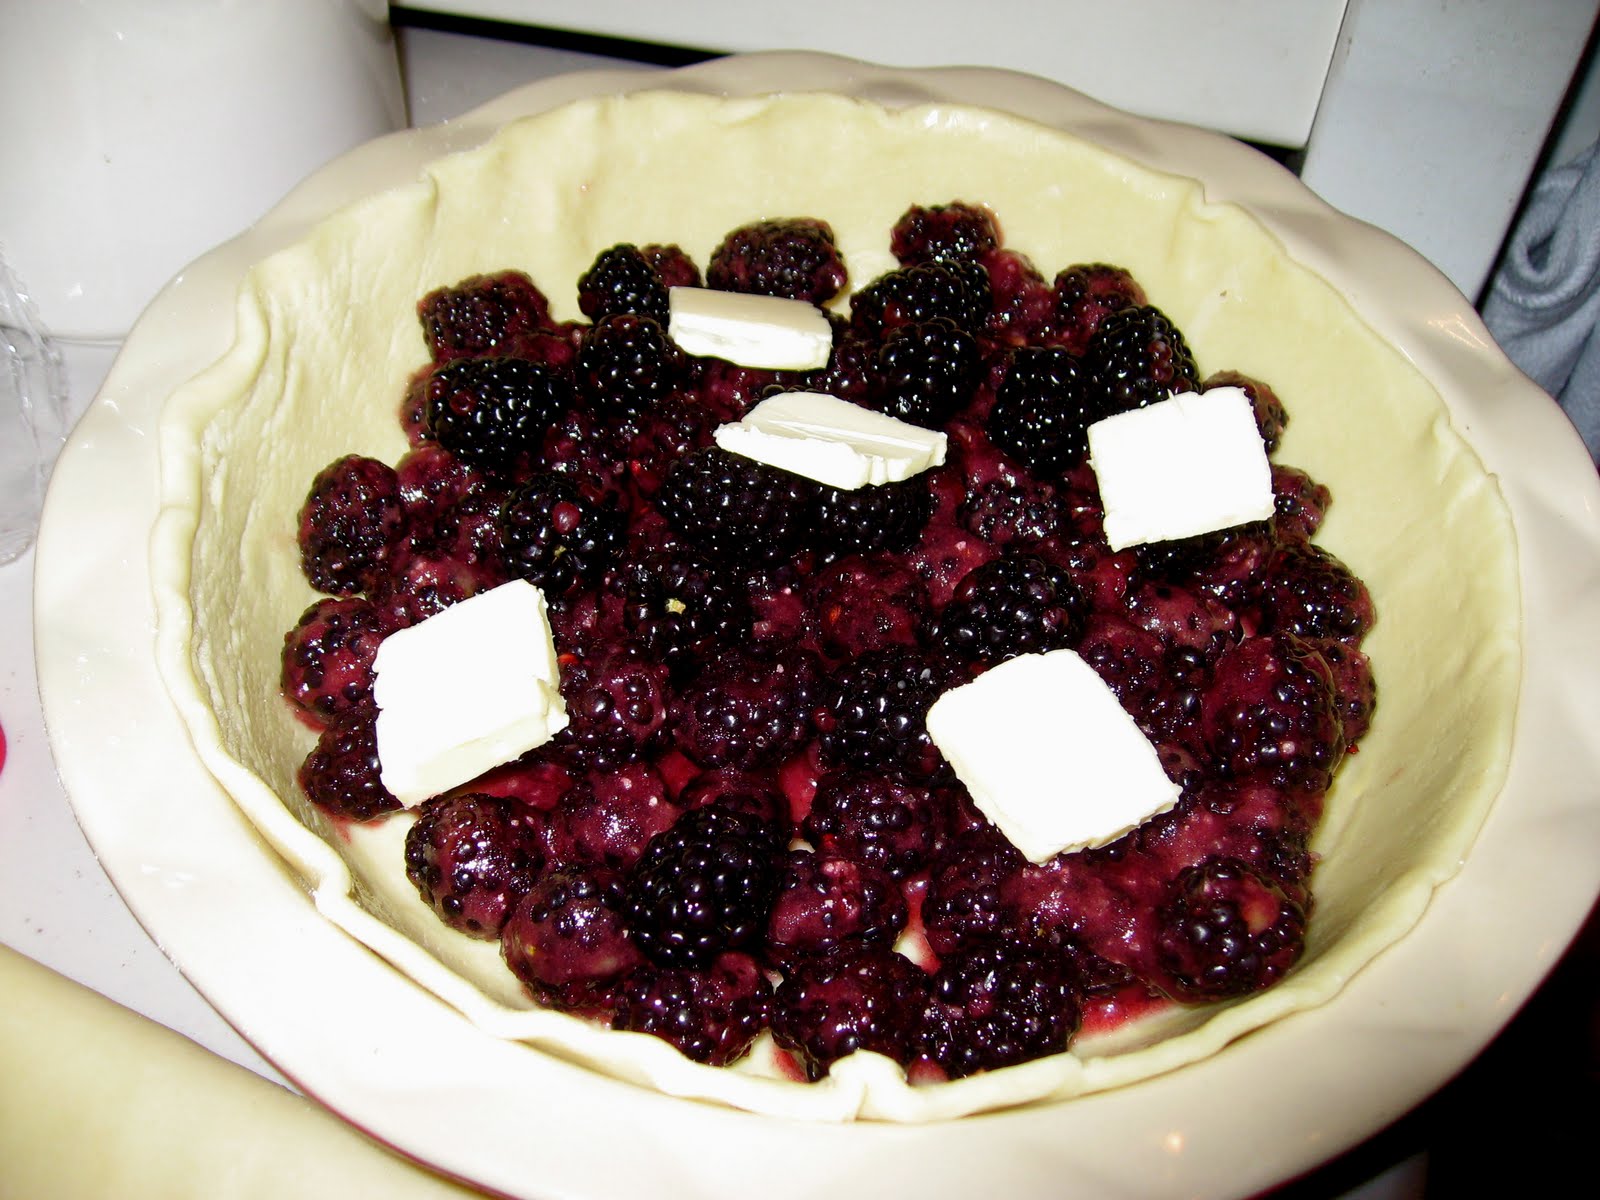
The store had a buy 1, get 2 free sale on blackberries, so this is the result. I found this recipe on allrecipies.com, and made a few changes as per the comments. Hopefully it tastes as good as it looks.

Update: It did. If not better.

Blackberry Pie

4 C fresh blackberries
1/2 C white sugar
1/4 C instant tapioca
A 9 inch double crust pie (store bought, I didn't have the patience for a hand made one)
eggbeaters
white sugar

Place the bottom crust into pie pan, brush with a little bit of egg or eggbeaters (this prevents the crust from becoming soggy). Combine 3 1/2 cups berries with the sugar and tapioca - mix until there are no clumps of white anymore, all dry ingredients stick to berries. Spoon the mixture into pie shell.

Spread the remaining 1/2 cup berries on top of the sweetened berries, and cover with the top crust. Seal and crimp the edges. Brush the top crust with egg, and sprinkle with sugar.

Bake at 425 degree F (220 degrees C) for 15 minutes. Reduce the temperature of the oven to 375 degrees F (190 degrees C), and bake for an additional 20 to 25 minutes.


Thanksgiving recipe #4 - Jello and Marshmallow Salad

This is another desert recipe - it is beginning to look as though we will have 4 deserts tomorrow, oy - and one that comes from Dave's family rather than mine. I idea of marshmallow salad always kind of put me off, but this is insanely delicious.

Grammy’s Green Jello and Marshmallow Salad

1 3oz pkg Lime Jello
¼ C sugar
1 C hot water
1 1/2 C miniature marshmallows
1 C crushed canned pineapple, fully drained of liquid
1 C cottage cheese (small curd)
1 C chopped walnuts (optional)
1 C heavy whipping cream (whipped) or Cool Whip

Mix together jello and sugar, then add hot water and stir until fully dissolved.

Add marshmallows, stir and let cool - wait until the jello feels like it is starting to set.

Add pineapple, cottage cheese and walnuts. Fold whipping cream into jello mixture, cover and chill in refrigerator for several hours until set - overnight is best.

Tuesday, November 23, 2010

Thanksgiving recipe #3 - Confetti Green Beans

Day three of my Thanksgiving recipe week brings you Confetti Green Beans - one of my favorite new vegetable dishes. It is really easy to make, looks festive, and tastes delicious. Since this one has no set measurements, judge for yourself how much of everything you need, based on how many people you are cooking for.

Confetti Green Beans

Green beans
Sliced almonds
dried cranberries
vegetable oil
boiling water

Have enough beans for the number of people you are cooking for - half a handful per person works well.

A tablespoonful of dried cranberries per handful of beans is a roughly the right amount - you don't want the cranberries to overpower the beans, but you want them noticeable, for both taste and color. The same goes for the sliced almonds. Just cover the cranberries in some boiling water for about 5 minutes, enough to get them soft.

Saute the green beans in oil for a few minutes, until they turn a bright, vibrant green. Pour in the water and cranberries, saute a few more minutes. Add the almonds, cook for another 30 seconds, and remove from heat.

Serve as soon as possible.

Monday, November 22, 2010

Thanksgiving recipe #2 - Noodle Kugel

Posting the recipe for The Pie - as well as checking the Amazon.com Black Friday deals page every hour - has given me the idea of posting a new recipe every day this week, based on my planned menu for Thanksgiving.

I have already posted the recipe for the Baked Brie and Apple Butter I plan on making as an appetizer, so here is another dessert recipe. I am not, incidentally, making The Pie this year. I may do so for Christmas, but four people just isn't enough to consume that monstrosity.

Noodle Kugel


1lb medium egg noodles
2/3 C water drained from noodles (saved)
6 eggs (1 1/2 C egg beaters)
¼ lb margarine
16oz applesauce or apple pie filling (I am using an apple cranberry pie filling from Trader Joe's)
½ C sugar
1 t vanilla
Cinnamon
1 C white raisins, cherries or dried cranberries (optional)

Boil noodles, drain and reserve 2/3 C water. Mix margarine with drained noodles and water. Add eggs, applesauce or pie filling, sugar, cinnamon & vanilla. Add raisins if desired.

Grease 9x13”pan. Add noodles, sprinkle top with mixture of cinnamon and sugar.

Bake 1 hour at 350 degrees.

Sunday, November 21, 2010

In advance, a Thanksgiving treat - The Pie!

Since Jocelyn asked so nicely, here is, just in time for Thanksgiving, the greatest apple pie recipe in the world. This was originally called the Special Apple Pie, but since then, it has become so infamous that if you say ‘The Pie’ in a serious tone, all of my family and friends will understand what is meant. This pie is made only at Thanksgiving, because one’s heart can only take this kind of abuse once a year. But it is sooo worth it.

Special Apple Pie, or, The Pie (Deep Dish)

Crust

1 ¾ c. all purpose flour
¼ c. sugar
1 t. cinnamon
½ t. salt
½ c. plus 2 T. butter (1 ¼ sticks)

For crust, combine flour, sugar, cinnamon and salt in medium bowl. Cut in butter using pastry blender (also called 'a fork') until mixture resembles coarse meal. Add water, toss gently with fork until evenly moistened. Gather dough into a ball and transfer to lightly floured board. Roll into a circle larger than a deep 10” pie plate. Ease pastry into plate and flute a high edge. Set aside.

As documented in an earlier post, crusts are easier said than done. If you don't have a lot of time, or simply don't want the rise in blood pressure, just get a pie crust from the store. HOWEVER, bear in mind that this recipe is for a DEEP DISH pie, so you will need TWO regular sized pie crusts for the same amount of filling as one deep dish crust.

*Because someone found this last bit of direction confusing: if you do not make a crust, and instead buy two normal-sized crusts, this will result in two pies. You will not somehow mold the two crusts together, or stack them, or who knows what else - you will simply make the filling and put it in the two separate pie crusts. Therefor, two pies.*

Filling

8 McIntosh apples, peeled, cored and sliced (McIntosh are the best, but an hard, tart baking apples will do)
1 2/3 c. sour cream
1 c. sugar
1/3 c. all purpose flour
1 egg
2 t. vanilla
½ t. salt

For filling, preheat oven to 450 degrees.

A quick note on slicing apples:

In order for apples to bake well, they must be relatively thin. Rather than cutting wedges, or using an apple slicer, it is easier to peel the apple, and cut slices off the sides. The pieces will naturally all be different shapes - the first few will be circles off the sides, then more rectangular in shape - and this will also help them fit better within the pie crust.

Combine apples, sour cream, sugar, flour, egg, vanilla and salt in a large bowl and mix well.

Spoon into crust.

Bake 10 minutes. Reduce oven temperature to 350 degrees and continue baking until filling is slightly puffed and golden brown, about 40 minutes longer. (If edges of crust brown too quickly, cover with strips of foil.)

As you can see in that last photo, I used two different types of crust. On the left is a Graham Cracker crust, on the right is a Pillsbury refrigerated crust. The latter worked far better for this type of pie.

Topping

1 c. chopped walnuts
½ c. all purpose flour
1/3 c. firmly packed brown sugar
1 T. cinnamon
½ c. butter (1 stick), room temperature

For topping, combine walnuts, flour, sugars and cinnamon and mix well. Blend in butter until mixture is crumbly.

Spoon over pie and bake 15 minutes more.

This is one of my favorite recipes, and I love introducing it to new people. Let me know if you make it, and how it turned out. Bon appetit and Happy Thanksgiving!

Wednesday, November 3, 2010

Balsamic Glazed Cipollini Onions

We went to the farmers market in Augusta, Maine a few weeks ago, and I got a small bag of cipollini onions - in Italian, that means 'onion onions'. How creative. The people who were selling them suggested using the enclosed recipe, as the onions are so flavorful on their own it is a shame to use them as an ingredient in a more complex dish.

Balsamic Glazed Cipollini Onions

6-8 Cipollini onions
boiling water
olive oil
balsamic vinegar
salt

Preheat oven to 400 degrees.

First, remove the onion skin by dipping the onions in the boiling water for about 30 seconds. Remove and quickly peel. Place onions in a baking dish and sprinkle liberally with oil, vinegar and salt, and whatever other seasonings you wish.

Bake at 400 degrees for about 30 minutes. Reduce to 350 degrees if the glaze concentrates too quickly.